
The Activity tab shows a list of accounts you've invited to use Fintech through E-Vite. The total can be seen above the table in Total Accounts.
The table includes the retailer's information, how they were invited (email, text, or Quick Register), when they were invited, their invite status, and whether they received their invitation (Delivery Status):

The table defaults to sorting by the 10 most recently invited accounts. You can also sort by a column by clicking on the column's header. Increase or decrease the number of accounts shown by using the Rows Per Page dropdown at the bottom right of the screen:

💡 Learn more about Quick Register invitations here: Sending E-Vites.
Searching for Accounts
Use the Search Field and Filters to narrow down the list of accounts in the Activity Table.

The Search field pulls accounts from Google. You can search by account name and/or account address. For example, if you wanted to search for an account by name and address if it’s part of a large chain, use the following format: Walmart 4010 N 9th Ave, Tampa FL
You can use the filter options to narrow down results by:
- Invite Status.
- Invite Type - email, text, or Quick Register.
- Date the invite was sent (All Time is selected by default).
- Delivery status of the invitation.
E-Vite Statuses
Invite Status
If an account has been sent an E-Vite, the status of their account will be shown within the Status column:
- Invited - The retailer was invited to join Fintech via email, text, or Quick Register.
⚠️ When inviting a retailer with Quick Register, they must click the registration link on their mobile device after scanning the Quick Register code to ensure their account receives an Invited status.
- Registered - The retailer has registered with Fintech and the account is being reviewed before going Live.
- In Progress - The relationship request has been submitted. Check with your account admin to confirm they have the Customer ID for this location.
- Live - The retailer is ready to process your invoices using Fintech.
- Processed - The retailer has processed invoices through Fintech for your company.
- Invite to Expire - The invitation has not been accepted in 55 days. You may want to send a reminder (learn more below) or reach out to the retailer.
- Expired - The invitation has not been accepted within a 90-day period. You will need to re-send the E-Vite.
- Denied - The retailer declined the E-Vite.
⚠️ Your account Admin will receive an email with further details when a retailer declines a relationship request. Contact your Admin or Fintech to determine whether the retailer can be sent another E-Vite.
If an account is listed as Invited even after they've joined Fintech and are receiving deliveries, contact Client Services to confirm how an account was registered. This may happen if the retailer registered with Fintech on their own.
Delivery Statuses
You view the status of an E-Vite within the Delivery Status column, which includes:
- Pending - The invite has been sent but has not reached the recipients inbox or phone.
- Delivered - The email successfully reached the recipient's inbox or phone.
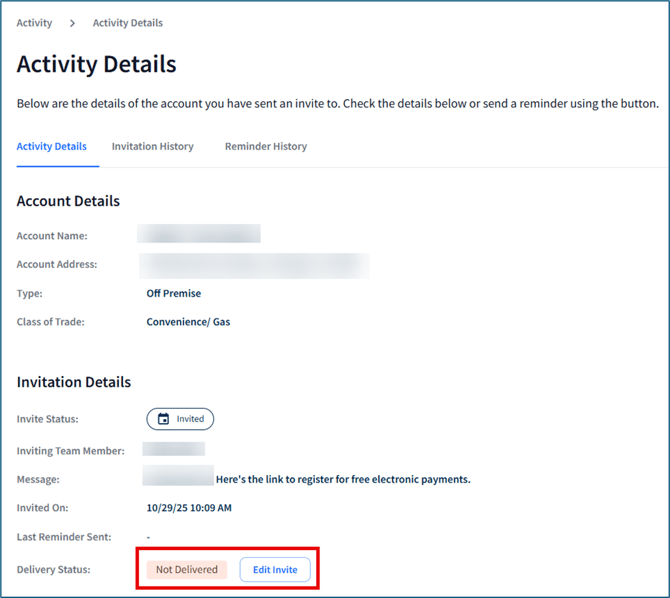
- Not Delivered - The invitation failed to reach the recipient's inbox or phone (possibly incorrect contact information, inbox rules, etc.). Confirm that your recipient's contact information is correct, and if needed edit the contact.
💡 If an E-Vite has a Not Delivered status, the contents of the invitation can be edited and sent to another recipient. Open the invitation and select Edit Invite:
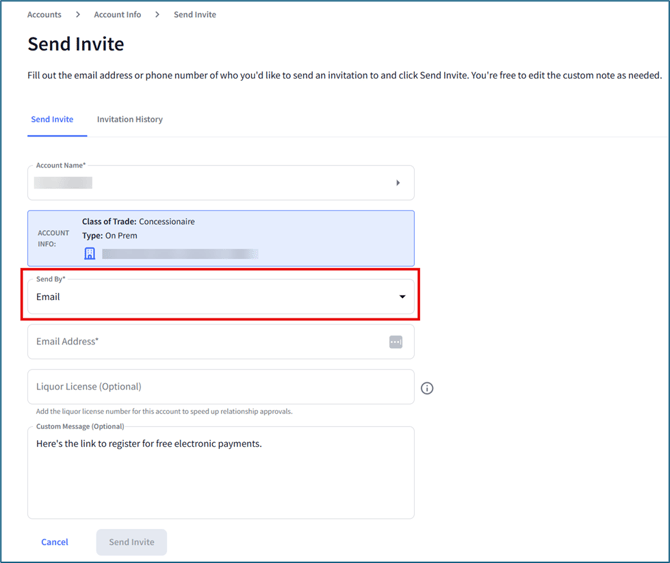
Use the Send By dropdown to resend the invitation via email or text, then enter the alternate email address or phone number. You can also edit the liquor license and invitation message:
Once finished, click Send Invite.
Viewing Activity Details
Click on an account in the table to view its Activity Detail. Here, you can view account details, send invitation reminders, or view invitation and reminder history:

- The Activity Details tab includes account and invitation information. If an E-Vite was sent and the account hasn't responded (check Account Status), you can click Send Reminder (read more below: Sending Invitation Reminders).
- The Invitation History tab lists the E-Vites that have been sent to this account. Each line shows who sent the invitation, date and time the invite was sent, the invite status (account status), and delivery status. The list of reminders is sorted from oldest to newest.
- The Reminder History tab lists the reminders that have been sent to this account. Each line shows the date and time the reminder was sent, and whether the reminder was Automatic (generated by E-Vite) or Manual (sent by a member of your organization). The list of reminders is sorted from oldest to newest.
Sending Invitation Reminders
⚠️ You're unable to send reminders to accounts with the following Invite Status: Registered, Processed, or Live.
⚠️ Basic users can only send reminders to accounts they've invited, while administrators can send reminders to any account invited through E-Vite.
After an E-Vite is sent and its status is Delivered, the retailer will be sent a total of 3 automatic reminders to their Fintech Portal account regarding the invitation:
- 24 hours after initial invite.
- 3 days after initial invite.
- 6 days after initial invite.
You can send an invitation reminder to an account that has not accepted an E-Vite, both on the web and in the mobile app:
- Select an account from the Activity page.
- Choose to send the reminder by email or text, then enter the email or phone number of the recipient:
Web Mobile App 

- Click Send Reminder.
Manual reminders can be sent at any time, but more than 24 hours will need to have passed since either the initial invitation, auto-reminder, or previous manual reminder we sent. You can send a maximum of two manual reminders per account; the Send Reminder button will become disabled for 24 hours after the first reminder, then permanently after the second.
⚠️ Once an invite has been Expired, reminders will be disabled, and you'll need to send a new invite to that account. Learn more here: How to Send an E-Vite.