How do I send invitations to retailer accounts in E-Vite?
Send your retailer accounts invitations from the Home page, as well as from the Accounts page.
Inviting accounts to use Fintech's invoice paying services via email or text is the most important feature in E-Vite. There are several ways to do this, including:
- Home > Invitation widget > Click Send Invite.
- Accounts
- Select Map View > Hover over an account dot to reveal a popup window > Click Send Invite.
- Select List View > Click Send Invite on a row in the table.
Additionally, with the E-Vite mobile app, retailers can be invited to create a Fintech account by scanning a Quick Register code from your device:

Upon scanning the Quick Register code, the retailer must click the registration link on their mobile device to ensure their account has an Invited status. They may then complete the registration form at any time. For more information regarding invite statuses, click here: What does the Activity screen show me?
⚠️ You cannot add a retailer's liquor license when sending them an E-Vite via Quick Register. Refer to Sending and Managing E-Vites below to learn more about including a retailer's liquor license in their E-Vite.
Sending and Managing E-Vites
The easiest way to send an E-Vite through email or text is by using the Accounts page:
- First, either:
- Select Map View > Hover over an account dot to reveal a popup window > Click Send Invite.
- Select List View > Click the Send Invite button on an account's row.

💡 If you cannot find the retailer you're looking for, you may need to add them as an account. Learn more: What if I can't find a retailer on the Accounts page?
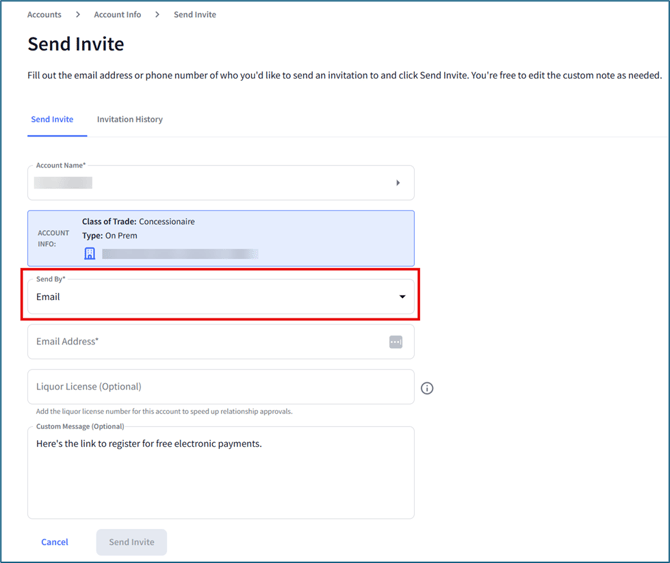
- The invitation form will appear with the Account Name and Account Info prefilled:

- Choose to send the invite via email or text in the Send By field, then input the contact information in the field underneath.
- Optionally, enter the liquor license number associated with the invited location. This state-issued number allows the retailer to purchase alcohol and can help you more accurately identify the location in your E-Vite account and if applicable, in your back-office system. If needed, the retailer can update this field during registration.
- You can include a custom message with the invite, but this is not required.
💡 If a retailer has an active Fintech account but has not received a relationship request from you, you'll be able to email their E-Vite to an existing user or a new contact. However, you will only be able to text the E-Vite to a new contact:

Read more about account statuses here: Finding Retailers using the Accounts page.
- When the invitation outline is ready, click Send Invite.
The retailer will then receive an email or text:


E-Vites remain active for 90 days. If a user opens their invitation but doesn't complete the relationship setup, they can return to the link within the 90-day validity period and finish the setup. You will not need to resend an E-Vite for this circumstance.
⚠️ If you ever deactivate a retailer account with active invitations, contact Fintech to get help expiring these E-Vites. Invitations that are still within their 90-day validity period can be used by accounts that have been deactivated.
Invitation Delivery Status
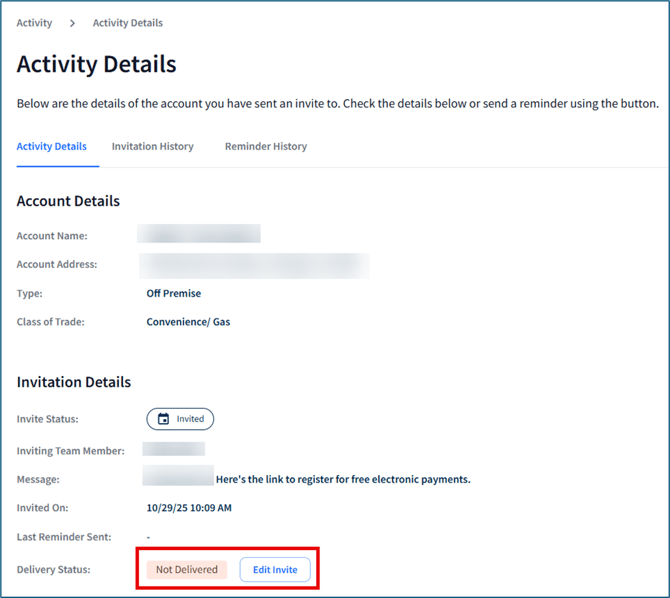
You can view an E-Vites invitation and delivery status within the Activity page, as well send invitation reminders or edit sent E-Vites if they are Not Delivered. Learn more here: What does the Activity screen show me?
Invitation Errors
If E-Vite is unable to send an invitation, message us for help via Settings > Contact Us. Learn more here: How can I contact Fintech for Help?
Resending Invitations
⚠️ You can send E-Vites to multiple contacts for a location but cannot send a new invitation to the same contact until the original invitation has expired.
If an E-Vite isn't accepted within 90-days, you can resend it by following the process above: use Accounts to find the retailer, click Send Invite, then fill out the invitation form.
If a retailer declines an invitation, your account Admin will receive an email with further details. Contact your Admin or Fintech to determine whether the retailer can be sent another E-Vite.
Editing Invitations
If an E-Vite has a Not Delivered status, the contents of the invitation can be edited and sent to another recipient. Open the invitation and select Edit Invite:
Use the Send By dropdown to resend the invitation via email or text, then enter the alternate email address or phone number. You can also edit the liquor license and invitation message:
Once finished, click Send Invite.
Managing Accounts
To learn more about finding and managing accounts, click here: How can I use the Accounts page to find retailers and manage current accounts?
