Getting Started with E-Vite
Invite retailer accounts to PaymentSource using E-Vite for quicker invoice payment. Learn how to register a company and invite your team.
E-Vite allows vendors to invite their retail partners to Fintech’s PaymentSource solution, making invoice payments easier, faster, and more reliable. Vendor reps can send interested accounts an invitation immediately (from phone or desktop) and track the invitation status from the app.
An administrator must register themselves and their company before their colleagues can access E-Vite. The administrator will be responsible for:
- Inviting colleagues and approving their E-Vite accounts.
- Approving colleagues' invitations to accounts.
- Providing registered E-Vite users from other vendors access to the company's E-Vite account.
These tasks will be sent to the Administrator via email, and in Settings > Users in E-Vite:

Learn more about user management here: Where can I manage access requests, invited users, and current users?
Registering for a Fintech Account
Both administrators and colleagues must create a Fintech account before registering for E-Vite. An administrator will receive an invitation email from Client Services to register for a Fintech account, while a regular user will create a Fintech account using the E-Vite home page:
- To begin registration:
- Administrators: Open the email invitation link from Client Services, then click Get Started (the link expires after 30 days).
- Basic users: Go to E-Vite, then click Get Started.
- Enter an email and password, then click Verify Email and Create Account.
- Click the Verify Account in the account confirmation email from Fintech to complete the registration process:


Registering for E-Vite
After creating a Fintech account, both administrators and basic users are ready to register for E-Vite.
Administrators will receive an email invitation from Client Services. Opening the invitation will activate their account and complete the company's E-Vite registration. Basic users can wait for an invite from their administrator or register for an account on E-Vite (steps below).
⚠️ Basic users will be unable to submit an access request during their E-Vite registration if their administrator has not activated their own account. Contact your administrator to confirm that they have activated their account before following the steps below.
💡 To learn more about Basic and Administrator roles, click here: How do I invite new users to E-Vite?
E-Vite Registration Steps
- To begin E-Vite registration:
- Administrators - Open the E-Vite email invitation from Client Services.
- Basic users - Open the E-Vite email invitation from your administrator, or log into E-Vite using your Fintech credentials.
- To complete E-Vite registration:
- Administrators - You will be redirected to the Select Company screen where you can choose your company and begin accessing E-Vite:

- Basic Users:
You can follow this video tutorial that outlines the steps below:- You will be redirected to the Finish Account Setup page where you can add your profile information. Click the Next button to continue:
💡 For the Designation field, pick the role that most closely matches your job. These do not impact your account capabilities.

- In the Select Distributors screen, search for the vendor(s) you work for, select the vendor tile, then click the Add to Selection button. Repeat these steps for each vendor before clicking Next:
💡 If you accidentally add the wrong vendor, click the vendor tile to remove it. If you forget any vendors, you can add them later in E-Vite under Settings > Organization > Manage Companies. See Where can I submit user access requests for other vendors that I work for?
If you cannot find your vendor, contact your administrator or Fintech's Client Services: How can I contact Fintech for Help?
- Click Next to review the added vendor(s), then click Submit. Upon next login, you will be notified of the request status.

- You will be redirected to the Finish Account Setup page where you can add your profile information. Click the Next button to continue:
- Administrators - You will be redirected to the Select Company screen where you can choose your company and begin accessing E-Vite:
Your Vendor List
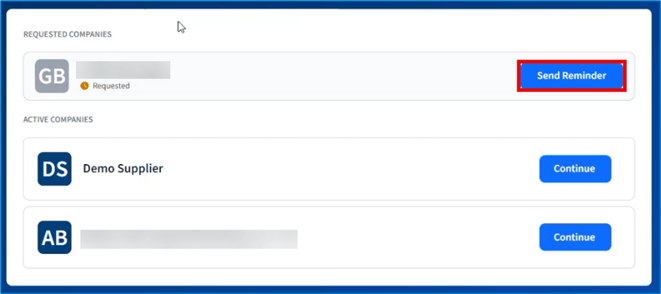
In E-Vite, you will be able to view the vendor's you work for within the Company List page upon logging in.
- To access a company’s E-Vite account, click that row’s Continue button.
- To set a default company, hover over the desired company and click the heart icon next to the Continue button. This will automatically direct you to that company’s E-Vite account on subsequent logins rather than having view the vendor list each time you access E-Vite.

💡 If you’ve added a company and sent a reminder for access but still have not been approved, contact your Administrator. If you don’t know who your Administrator is, contact Fintech: How can I contact Fintech for Help?
You will also be able to switch between these vendors while logged into E-Vite by clicking on your profile in the top right corner of the portal, then selecting Switch Company:

